Yule Goat Ornaments
Updated December 2018I was asked to make a tutorial on how I make my felted Yule goat ornaments!
Yule goats are a part of the season in part their durability. Many times during the harsh winters of yore, the cows wouldn’t produce milk during the winter’s while goats would. Not only that, but the nature of the goat eating pretty much anything to survive meant that even if hay had run out, a family could still feed the goat from their stores and from their compost heap, even scraps from the table and cooking and would still produce milk. The Yule goat has become a symbol of strength, perseverance and one of blessing, staving off the harsh realities that winter can impose.
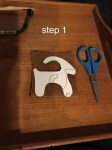
Step 1: Make you guide out of cardboard or sturdy paper. If you would like to print off the template, I made a quick google doc.
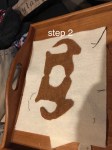
Step 2: Lay on piece of doubled felt and cut along outline.
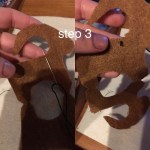
Step 3: Tie a knot on end of embroidery floss and pull through one side right at the neck.
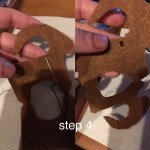
Step 4: This isn’t really step,but make sure that the side where the knot is will be the inside of the Yule goat to hide the knot.
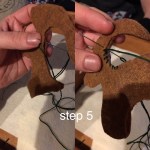
Step 5: Bring both side together and use a whip stitch to loop along the edges from the neck forward and all along there whole thing until just past the tail. They don’t have to be super close together, but try and keep the distance uniform and tight.
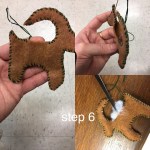
Step 6: Leave enough room to put stuffing in the goat using a chopstick, wooden skewer etc. You can also add in herbs, spices, crystals, sigils, or written petitions inside.
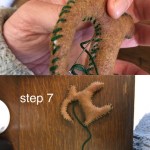
Step 7: Once it is full of stuffing, finish sewing up the back to your first knot and tie off a knot to keep it from unraveling.
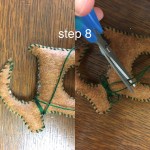
Step 8: (optional) if you have enough excess, wrap the remaining floss around the neck until you have a just enough to tie a little bow. I usually tie the bow facing whichever side I designate at the front.
Step 9: Using black thread, or even a small seed bead, you can sew on an eye. If you want to decorate the goat more, use thin ribbon or trim and decorate to your style, trying to sew it in place with minimal stitches to avoid making bulges in the stuffed goat.
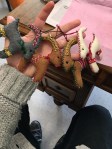
Step 10: Sew a small loop from the horn, pinch it in place to see what part is balanced, and sew the loop there.These ornaments are pretty cheap to make and once you get the hang of it, you can make a bunch. Supplies include: Felt, needle and embroidery floss, stuffing, and optional decoration and supplies listed in step 6.
Merry Yuletide!
🦇Cheers, Barberwitch
- Original content of this blog is licensed under a Creative Commons Attributution-NonCommercial-NoDerivatives 4.0 International license
This post is not meant for terfs, or nazi’s. I see an uptick every winter of them reblogging this.Witch Tip Wednesday 12.5.18
Yule Goat Ornaments
Yule goats are a part of the season in part their durability. Many times during the harsh winters of yore, the cows wouldn’t produce milk during the winter’s while goats would. Not only that, but the nature of the goat eating pretty much anything to survive meant that even if hay had run out, a family could still feed the goat from their stores and from their compost heap, even scraps from the table and cooking and would still produce milk. The Yule goat has become a symbol of strength, perseverance and one of blessing, staving off the harsh realities that winter can impose.
Usually Yule Goats were made from bent straw, wrapped in red ribbon or string, this falls along the lines of straw art done near harvest like the Corn Dolly tradition for fall that I posted about a while back. This is a modern adaptation that is a lot easier than soaking straw and braiding it, so I hope you enjoy it!
If you do make these, please send me pictures! I loved seeing them last year 💚


 As you can see, OP twisted two pieces of wire together and left loops at the end (to attach the ribbon). Then they covered it in brown floral tape.

 Repeat this for all your remaining flowers.
 Repeat this for all your remaining flowers.
 Do this until all your flowers have been attached to your crown.

