ask around to see if your particular fandom has a similar organizer
talk to fandom friends, especially other writers. They might help or they could point you in the right direction
know what you’re looking for and put out a post seeking it.
Examples of that last point would be something like,
“I’m looking for a Spanish speaker, preferably from Argentina, to help me add some Spanish into my fic and give me some cultural insights.”
“I need some help wrangling my tenses on my latest fic. Is anyone able to help me out? I’m writing about [ship, fandom, etc]”
“Can anyone help? I’ve got a story that I want to set in London, but I’ve never been there.”
Does anyone else have some tips to share? Or examples of finding (or being) a beta?
-Mod Pi
If you’re a writer and you want to be a beta reader, please don’t do what I did when I first started beta reading.
When I was younger, I got started in literature as a writer. I had my own developing writing style and my own writing voice. I felt that this was the “right way” to write. Clearly, I was wrong!
I would beta read with the subconscious bias of trying to fix other people’s writing with my own writing style and writing voice, instead of looking out for stuff that’s actually helpful. Trying to force your own writing style and writing voice on someone else, especially a young or inexperienced writer who doesn’t have a full grasp on their voice and style yet, is very detrimental to their confidence and writing growth.
So here’s some stuff that’s actually helpful!
Reading and In-Story Stuff
1. Your first impressions, (both good and bad) especially of worlds or characters, and why. This helps with the writer being able to understand how readers see their characters.
2. What you liked about the world. This helps the writer understand what the readers connect with and enjoy, and what they relate too.
3. What you didn’t like, but because the story was immersive, not because the writing was bad; a character who made you genuinely angry and you want to kick him in the nuts or something, or a world flaw that makes sense and to actually go into the world and start helping the characters start riots. This helps the writer make sure that what’s meant to make readers angry, are actually making them angry.
Writing and Writerly Writing Stuff
1. Commentary on the pace of the story. Writers read their stories over and over and over, so most of us get blinded by how fast things are actually escalating, or how long the story seems to drag. A reader will be able to tell right away if things are just moving way to fast, or aren’t moving fast enough and things are boring.
2. Some of your favorite lines and word choice and why. Sometimes writers don’t actually notice the clever things that they say, and readers will find a more unexpected outlook on the story then the writer.
3. Clunky phrasing or awkward sounding sentences. Sometimes this can be dialogue, sometimes this can be transitioning paragraphs. This is never really particular word choice. Again, writers have been staring at their stories for hours for days on end, so we just get blind sighted by things that are obvious to other people.
Respectfulness and Considerations
1. DON’T fUCKING cOMmENT on THE sPELLiNG oR gRAMMaR. If a writer sends you a 3,894 word chapter with intense drama, 2 different plot twists, an important new character reveal and a major character death, and all the reader cares about is 4 different misspelled words and 3 grammatical mistakes… that’s annoying as all hell. Unless this story is going to be posted/published in the next 23 minutes and it needs super speedy proofreading with no comments whatsoever on the story itself, then okay, this is fine. Or if they directly ask you for grammar and spelling help (maybe because they’re not writing in their native language or if they don’t have a full grasp on all of the writing rules yet) then go ahead. But it’s disheartening most of the time and the story itself feels ignored.
2. If you come across a paragraph that’s just not doing it for you, stop and consider for a few moments as to why. Try and figure out what the issue is first, and if you can’t, ask for clarification as to what’s going on. And then add your critique. Try to explain why it’s not sitting right with you, not just giving an example as to how you’d re-write it.
3. Not all writers are the same and not all writers are looking for the same things. It helps to ask. Ask ask ask ask. Ask them what they’re looking for, what they want help with, and what they expect from you as the first reader of their story. Some might want brutally honest and vicious critique where you rip their story down sentence by sentence. Some writers might actually hate this with a flaming passion and won’t want this at all, and would actually much prefer more positive, gentle, encouraging feedback.
————-
For writers looking for beta readers, especially from other writers, please be mindful of the time you’re requesting from strangers. If someone you’ve never met before went up to you in Starbucks and asked you to read their unpublished novel, or listen to their mixtape, would you?
In my experience, It’s always much much easier to reach out first and offer to read or review someone else’s work. Not once, not twice, but several times. You get back what you give, and this applies with time and attention as well.
Building a genuine relationship first helps a ton. Build up trust with other writers, and become a regular reader of their work. Get in touch with other fanfic writers in your fandom, or get in touch with other writers in your genre. Read tons of fanfic and stories, and leave genuine reviews in the comments.
That’s all the advice that I can give right now, but hopefully it helps.
i’m just gonna post all the ways i’ve found so far to get RSS Links They Don’t Want You To Know About from social media sites, because people keep Leaving Tumblr Forever in favor of sites that i’m not going to use
(if you don’t have an rss reader yet just make a feedly account, it takes about one whole minute, if you decide to use a different reader later you can export your whole list, it’s fine)
i’m gonna use strikethrough to indicate the text you need to replace and also include examples of feeds that seem to work
A General Rule
on almost any website look for the icon that looks like this
that’s the button that means ‘the rss feed is here’
Tumblr
just add /rss to the end of literally any blog’s url, including tags
i.e. unpretty.tumblr.com/rss or unpretty.tumblr.com/tagged/original/rss
now you can Leave Tumblr Forever and still follow blogs until such a time as tumblr implodes in earnest
Dreamwidth
use username.dreamwidth.org/data/rss
i.e. gallusrostromegalus.dreamwidth.org/data/rss
WordPress
if it’s hosted on WordPress.com, just add /feed to the end of the url
if it’s self-hosted (i think around 20% of people who have their own website use wordpress to host it, i know i do bc it’s easy as sin) also just add /feed to the end the url
i.e. en.blog.wordpress.com/feed or kittyunpretty.com/feed
ArtStation
use username.artstation.com/rss
i.e. beccahallstedt.artstation.com/rss
Mastodon
just add .rss to the end of someone’s profile url
i.e. cybre.space/@kittyunpretty.rss
deviantART
use backend.deviantart.com/rss.xml?q=gallery%3Ausername
i.e. backend.deviantart.com/rss.xml?q=gallery%3Aarvalis
YouTube
this one’sa goddamn pain in the dick because you need to find the channel id first
in general youtube channels have a nonsense url like youtube.com/channel/abunchofbullshit
you have to take that last bit and plug it into youtube.com/feeds/videos.xml?channel_id=abunchofbullshit
i.e. youtube.com/feeds/videos.xml?channel_id=UCbpMy0Fg74eXXkvxJrtEn3w
Tapas
this is mostly handy for webcomics that were hosting on tumblr and crossposting, i think? i don’t know how tapas works for creators tbqh. anyway they’ve actually got a button at the top when you go to the comic page.
the one between ‘add to library’ and the paper airplane will give you the rss feed
LINE Webtoons
ditto wrt tumblr-hosted webcomics, and also having a button
the button to the left of the one that says +subscribe will get you the rss feed
Twitter & Instagram
these are the only two sites i’m including that don’t have native rss support, just because so goddamn many people have literally no other web presence at all for some reason
twitter used to have rss feeds but killed them, and i don’t think instagram ever had them. you have to use workarounds for these, and a lot of them end up getting killed, like TwitRSS.me. fetchrss seems to work okay but it costs money. if you pay for inoreader they’ve got built-in support for following twitter accounts but that’s not a practical solution for most people.
right now i use rsshub.app/platform/user/username
i.e. rsshub.app/twitter/user/dasharez0ne
… but the instagram one doesn’t actually seem to work, like, most of the time. i don’t know if i’ve found one that works ever. if you’re jumping ship there please consider doing the world the enormous goddamn favor of just making a free wordpress.com account and cross-posting all your instas with ifttt or something, rather than being totally at the mercy of mark zuckerberg
So here is the thing that I feel like OP left out but maybe not – the point of all that up there is so you can create what amounts to a dashboard –across all sorts of sites of everywhere people are at into a single thing for you to look at without having to visit a zillion different URLs. It’s awesome. It’s old skool tho (circa the 90s and the 00s) and doesn’t always work the way you think.
I was asked to make a tutorial on how I make my felted Yule goat ornaments!
Yule goats are a part of the season in part their durability. Many times during the harsh winters of yore, the cows wouldn’t produce milk during the winter’s while goats would. Not only that, but the nature of the goat eating pretty much anything to survive meant that even if hay had run out, a family could still feed the goat from their stores and from their compost heap, even scraps from the table and cooking and would still produce milk. The Yule goat has become a symbol of strength, perseverance and one of blessing, staving off the harsh realities that winter can impose.
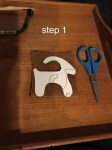
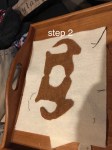
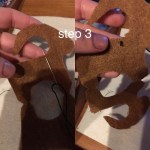
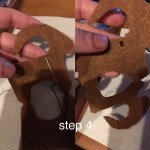
Step 1: Make you guide out of cardboard or sturdy paper. If you would like to print off the template, I made a quick google doc. Step 2: Lay on piece of doubled felt and cut along outline. Step 3: Tie a knot on end of embroidery floss and pull through one side right at the neck. Step 4: This isn’t really step,
but make sure that the side where the knot is will be the inside of the Yule goat to hide the knot.
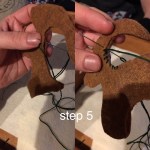
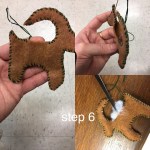
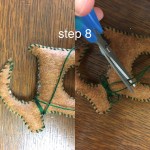
Step 5: Bring both side together and use a whip stitch to loop along the edges from the neck forward and all along there whole thing until just past the tail. They don’t have to be super close together, but try and keep the distance uniform and tight. Step 6: Leave enough room to put stuffing in the goat using a chopstick, wooden skewer etc. You can also add in herbs, spices, crystals, sigils, or written petitions inside. Step 7: Once it is full of stuffing, finish sewing up the back to your first knot and tie off a knot to keep it from unraveling. Step 8: (optional) if you have enough excess, wrap the remaining floss around the neck until you have a just enough to tie a little bow. I usually tie the bow facing whichever side I designate at the front. Step 9: Using black thread, or even a small seed bead, you can sew on an eye. If you want to decorate the goat more, use thin ribbon or trim and decorate to your style, trying to sew it in place with minimal stitches to avoid making bulges in the stuffed goat. Step 10: Sew a small loop from the horn, pinch it in place to see what part is balanced, and sew the loop there.
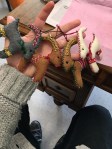
These ornaments are pretty cheap to make and once you get the hang of it, you can make a bunch. Supplies include: Felt, needle and embroidery floss, stuffing, and optional decoration and supplies listed in step 6.
Original content of this blog is licensed under a Creative Commons Attributution-NonCommercial-NoDerivatives 4.0 International license
This post is not meant for terfs, or nazi’s. I see an uptick every winter of them reblogging this.
Witch Tip Wednesday 12.5.18
Yule Goat Ornaments
Yule goats are a part of the season in part their durability. Many times during the harsh winters of yore, the cows wouldn’t produce milk during the winter’s while goats would. Not only that, but the nature of the goat eating pretty much anything to survive meant that even if hay had run out, a family could still feed the goat from their stores and from their compost heap, even scraps from the table and cooking and would still produce milk. The Yule goat has become a symbol of strength, perseverance and one of blessing, staving off the harsh realities that winter can impose.
Usually Yule Goats were made from bent straw, wrapped in red ribbon or string, this falls along the lines of straw art done near harvest like the Corn Dolly tradition for fall that I posted about a while back. This is a modern adaptation that is a lot easier than soaking straw and braiding it, so I hope you enjoy it!
If you do make these, please send me pictures! I loved seeing them last year 💚
Hmm, I just reblogged it from another site, but I think I can help you in terms of what to buy and how to do it. If you click the link, it’ll take you to the complete photo post that shows you what you need. In any event, here’s the list:
Nail polish
Floral wire, a thin bendable wire is ideal. 26 Gauge is fine.
Floral Tape
Wire cutters/scissors
a pencil or cylindrical object to wrap the petals around
Ribbon (optional)
DIRECTIONS
First, you’re gonna need to make the crown. You can do this by using the wire you already have or you can use an old headband or anything that you like that resembles a headpiece. Thicker wire is also fine for this step. As you can see, OP twisted two pieces of wire together and left loops at the end (to attach the ribbon). Then they covered it in brown floral tape.
The second step is to make the flowers. Using your pencil/cylindrical object, twist the wire around it to create a ‘petal’. Repeat this until you have at least a couple of petals. 3-6 is usually fine, it’s really your call.
SLIGHTLY bend the petals back to create a natural looking petal.
After you are satisfied with the shape of your petals, cut out your flower, leaving some wire left to attach it to your crown.
Repeat the first few steps and make the rest of your flowers.
Take one of your flowers and CAREFULLY apply nail polish to it, one petal at a time. Think of it like making bubbles. It may be easier to pour the nail polish in a flat plate and dip it, or dip the entire flower into the polish.Repeat this for all your remaining flowers.
Twist the two ends of your flowers together to form a ‘stem’.
Wrap the stems with floral tape, preferably with the same color you used in the base of the crown.Repeat this for all your remaining flowers.
The third step will be attaching the flowers to your crown. You can do this a few ways. One way is to wrap the stems around the crown. Another way is to just wrap the stems with floral tape as you go along, like the OP did.Do this until all your flowers have been attached to your crown.
At this point, you can tie the ribbons to the loops like OP did, or decorate it any other way you like. 🙂
Enjoy your new floral crown!
TIPS
You can purchase most of the items in Walmart, Michael’s or any craft or flower store. You can also order it online. 🙂
REMEMBER, this tutorial is just a guide. If you don’t want to use brown floral tape or if you prefer using the green floral wire, don’t be afraid to change it up. You can use any color or material your heart desires.
Woah! How do you subscribe to tags on AO3?! This will change my life…
A GUIDE APPEARS!
One thing to note: with a subscription to a tag, new stuff will show up in the subscription BUT updates of old fics will NOT show up. (I get round this by subscribing to individual stories if I want to keep track of them, then unsubscribing when the story is finished or if I lose interest.)
In order to get the “subscription”:
Find a fic with the tag you want. It can be any tag, not just ship tags, though for demonstration that’s what I’m using. (ETA: this may be incorrect; it seems only tags that belong to single fandoms, or possibly only ship tags, have feeds.)
Click on the tag. A page should load with that tag’s works in order from most recently updated to oldest.
In the upper right corner you should see a line of buttons: “Works” “Bookmarks” “Subscribe To The Feed”.
Click on “Subscribe To The Feed”. A new page will open.
Now, from this point you can do several things.
If you have an RSS reader like Netvibes or Feedly, you should be able to copy the URL (it will look something like “http://archiveofourown.org/tags/32197/feed.atom”) into the “new feed” option on your RSS reader.
If you want the feed streamed into your email, it looks like BlogTrottr can take the URL and your email and set that up for you. I haven’t used it, but it looks easy and harmless.
If you use Live Bookmarks, which updates your bookmarks when new fics come in, you can go that route too.
You can simply bookmark the feed page, though at that point you may as well just bookmark the tag page instead.
I use an RSS feed for everything I possibly can, including podcasts like Welcome To Night Vale and Caustic Soda, webcomics like Girls With Slingshots, and proper blogs like Chicago Architecture Blog. You can even use it to stalk tumblrs you don’t want to visibly follow (I have a few NSFW tumblrs that I follow on my feed rather than my dash). It’s very handy if you tend to forget to check sites you like to read.
One caveat — until you are getting a feed you don’t really have a sense of how many new fics are posted per day. I subscribe to Steve/Tony, Steve/Sam, Tony/Pepper, and a few others, but while I like Steve/Bucky I had to unsub from the tag because it was too busy for me to cope with on a daily basis.
Frustrated or triggered because of that one tag/ship/fic/author that keeps showing up while you browse ao3? Here’s step-by-step guide to blacklisting à la tumblr savior on Archive of our Own.


As you can see, OP twisted two pieces of wire together and left loops at the end (to attach the ribbon). Then they covered it in brown floral tape.
Repeat this for all your remaining flowers.
Repeat this for all your remaining flowers.
Do this until all your flowers have been attached to your crown.


